- Introduction:
In order to get a lasting result with paints on a pool there are 3 key things to follow and a few others that assist.
- Three Key factors:
- The surfaces need to be clean; no fats, oils or dirt etc
- The surfaces need to be stable: no drummy, soft, worn, blistered areas.
- The product needs to be mixed, applied and allowed to cure correctly.
- Note as follows: (Full details in the Application Notes)
- Use detergent and water to clean surfaces, NOT acid.
- Remove any suspect surface: blisters, drummy areas, weak and worn areas, any cement surfaces showing rust stains.
- Repair defects using materials designed for water IMMERSION, not external or internal use.
- Before coating, any surface moisture is to be removed, though damp surfaces okay so long as warm sunny day is happening.
- Do not apply if SURFACE (not air) temperature is below 13 C and falling. Use infra-red thermometer to check surface temperature.
- Apply coatings in the morning so as to finish by 12 noon (winter) 1 pm (summer) times. If you apply later may not cure before evening dew and thus a white bloom may occur.
- Mix by power mixer thoroughly and use immediately after mixing.
- We advise to mix enough material usually half of the pack to do “cut ins” corners and steps first. Use the following ratio 4 parts of part A (Resin) to 1 part of Part B (Hardener), by weight. Example: 2kg (half of supplied Part A) will need 0.5kg (half of supplied Part B).
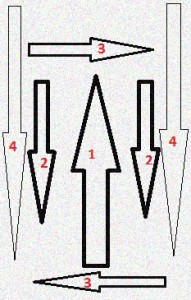
- When applying do about 1 – 2 sq M per application. Roll (brush) into an “H” pattern to spread the paint around and lap adjoining areas. See attached sketch.
- Note that life is related to dry film thickness, so MAKE sure evenly spread out. Otherwise some areas will wear away too soon and others will last much longer.
- Allow to cure without dew, rain, for 12 – 24 hrs between coats or longer in winter, but no more than 72 hours.
- After last coat wait 5 days (summer) 7 days (winter) before filling and adding chemicals. ( if you need to fill sooner, call us first)
- Dilute or dissolve ALL chemicals before putting into pool, inc salt.
- Ensure pool water balance kept to our recommendations for maximum life.
- Loaded roller, middle of 1 x 2 M area, roll up or away to apply.
- Then roll on R and L sides to apply more coating.
- Roll across WHOLE area to move paint around and get uniform coverage.
(Repeat 2 and 3 if needed to make sure UNIFORM coating thickness).
- Lay off in ONE direction, usually down walls and towards you on floors.
- Move to next 1 x 2 M area and repeat, over lapping just completed areas by about 100 – 200 mm.
4. Summary
By following the key aspects detailed above (and those in the Application Notes) you will get a much better outcome. If not sure about anything, contact us before you start


